All the features described below are available in the editing page . This one will be useful to you when you want :
- to create a track in expert mode - accessible from the side menu
- to edit an existing track - accessible from the page of your track
- to duplicate a track - accessible from the page of your track
- to creat an alternative route - accessible from the editing page of your track
- to edit an alternative route - accessible from the editing page of your track
On the edit page, you can create or edit a trace in several steps. Some tools are only accessible with a subscription.

To create or edit the geometry of your track, you can use tools distributed in 4 toolbars

You can import existing data to create your track. You can choose between :
- a gpx file
- an existing track : you will need to enter the track number
- your draft
A draft is a track that you have saved from the editing page (see next toolbar). This draft can be used to save your current work, but also to copy a portion of track for use in another track.
If you import multiple datasets (2 gpx or a draft and a gpx), the imported tracks will be automatically juxtaposed.


To draw the geometry of your track, you can use two tools :
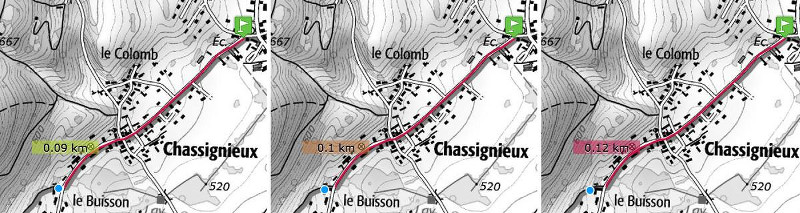
- the first Add point it allows you to add points one by one. To improve the calculation of distance and elevation, it is important to add enough points. Thus, when you move your cursor, the distance of your track is displayed as a tooltip; it can be of three different colors:
- GREEN if the cursor position is close enough to the previous point (less than 30m),
- ORANGE if the distance is too big (between 30 and 50 m),
- RED if the distance between the curdor and the last point is far too big (more than 50 m).
You can add an existing track to your map by using the button Add a track located in the switcher layer. When you will add points, the cursor will be snaped on this track.
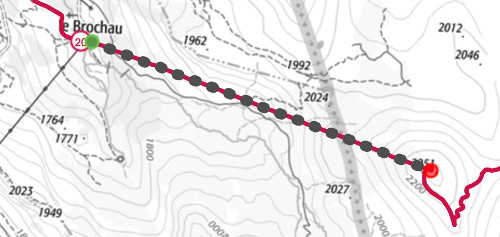
- the second Planned route automatically calculates the route based on IGN or OpenStreetMap data. The calculation is done between the last point of the trace and your mouse click. If the IGN maps are displayed, the route will be calculated on the IGN data, otherwise it will use the OSM data.
- returning by the same way (your track makes a round trip),
- with a straight line to complete your track
- with the first tool Edit points, you can move a point in your track, add a point or remove it. To delete an existing point, simply click on it.
The points in your track will only be displayed if you zoom in enough.
- with the tool Shortcut your track, draw a line, point by point, that cuts your existing track in two places to replace an existing portion.
- Shortcut with a planned route : the procedure is the same as for the previous tool, but the portion to insert is calculated automatically with the IGN or OSM data.

The following two tools are used to close your track :
The last tool of this toolbar Save my draft allows you to save your current track. Your work is saved and can be used later to create a new track using the tool Import my draft.
You can only use one draft. With each backup, the previous draft is replaced.

Many tools will allow you to modify the geometry of your track.


With the tool Reverse the track, the starting point becomes the point of arrival and vice versa.
You can use the tool Truncate the track to draw a polyline that cuts your track at a point to remove the portion between that point and the end point.
By using these last two tools one by one, you can trim your track from the start
To finish with this toolbar, use the tool Move the starting point to define a new starting point. Just click on an existing point in your track after selecting the tool.

With the first two tools in this toolbar, you can undo the last action you performed or restore it if you change your mind. You can undo up to 15 actions.

You want to delete a portion from the start of your track? Reverse the track, then use the tool Truncate the track.
Finally the tool Delete the track will allow you to delete the geometry of your track to start from scratch.
Once the geometry of your trace completed, you can start the creation of the elevation profile with the button Calculate the elevation profile. Several calculation methods are available depending on the origin of your trace (gpx or manual drawing) and on your subscription. Depending on the method chosen, you will have to set several parameters (elevation treshold, distance treshold, smoothing). To learn more and make the right choices, go to this page.
Before starting the profile calculation, consider updating the characteristics of your trace. For a good estimate of the distance and elevation gain, a track must have about one point every 10m. In addition, if your track has a proportion of points with GPS altitude that is too low, choose a calculation method based on the use of a DEM.

Once the profile is created, you can change the minimum and maximum elevation values and hide the slope display.
Points of interest allow you to provide additional geolocated information on your track. Feel free to add them using the specific toolbar !

To add a point of interest, simply activate the tool Add a POI and click on the map. When the POI is added, it is selected and the Point of interest tab on the left side of the screen opens to allow the configuration of the new POI.

The POI configuration requires four steps. To configure a POI, you must select it either on the map with the selection tool or in the POI configuration tab. You can select multiple POI using the SHIFT key on your keyboard to delete multiple POI in one operation.
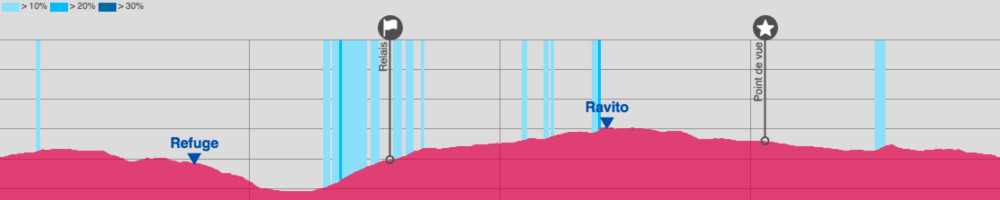
On the map, your POI can be displayed as an icon or label (subscription required).
If you choose the icon, you can select 1, 2 or 3 for a single POI with an online, column or triangle layout.

If you choose the label, you can choose its style and associate a shape (circle, triangle, star ...)
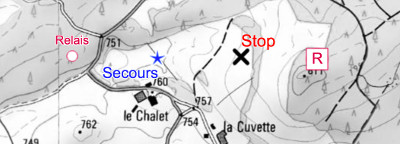
Center your text with the 0 values in X and Y offset to write inside the shape (like the right POI in the example above).
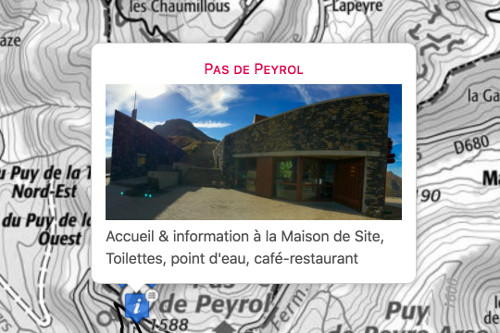
To configure the tooltip, you can enter a title, a description and choose an image.
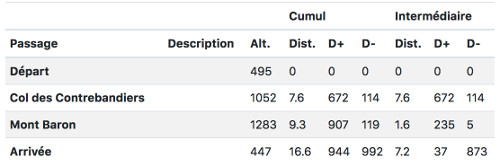
When you create a track, a POI table is automatically created. The default contains only the start and end points. Nevertheless, you can choose to display additional POI by entering a title and a short description.
POI are saved only when you save your track
If this description is not completed, you will not be able to save your track. You will need to fill out the following fields :
- The name of your trace by following the naming rules of the website : to read here !
- The type of activity (trail running, swimrun, MTB...)
Some activities must be placed in private (water sports, ski touring, road cycling ...)
- Access to your track: public or private
If you purchased a subscription, you can share your private traces by providing the access code to your contact.
- The type of course :
- Training : you will have to specify if you have already completed the route
- Competition : you must specify the date of the competition
- Competition with restricted access : the restricted access will block the download of the gpx and will display a message on the map explaining that the route is only accessible on the day of the competition.
- The main ground : footpath, path or surfaced road
- Image associated with your track
- Category: only you can see it. It will allow you to classify your tracks to find them more easily
- Website
- Description
- Starting and arrival location if those completed automatically are not exact
- Start and end POI information for tooltip display and POI table
You can define a photo gallery for each track (subscription required): users will be able to view this gallery on your track page.
You can create alternative routes for your track (only for Trailer Ultra and Premium + subscribers).
On the edit page, the alternatives routes tab is available only when you edit an existing track.

You can create a new alternative route, edit it, or delete it. The steps are the same as for creating or editing a normal track.
When you create or modify an alternative route, the main track is displayed on the map and your alternative route must intersect it in one or two points.
You can create :

All alternatives routes of a track will be displayed in the switcher layer on the track page.
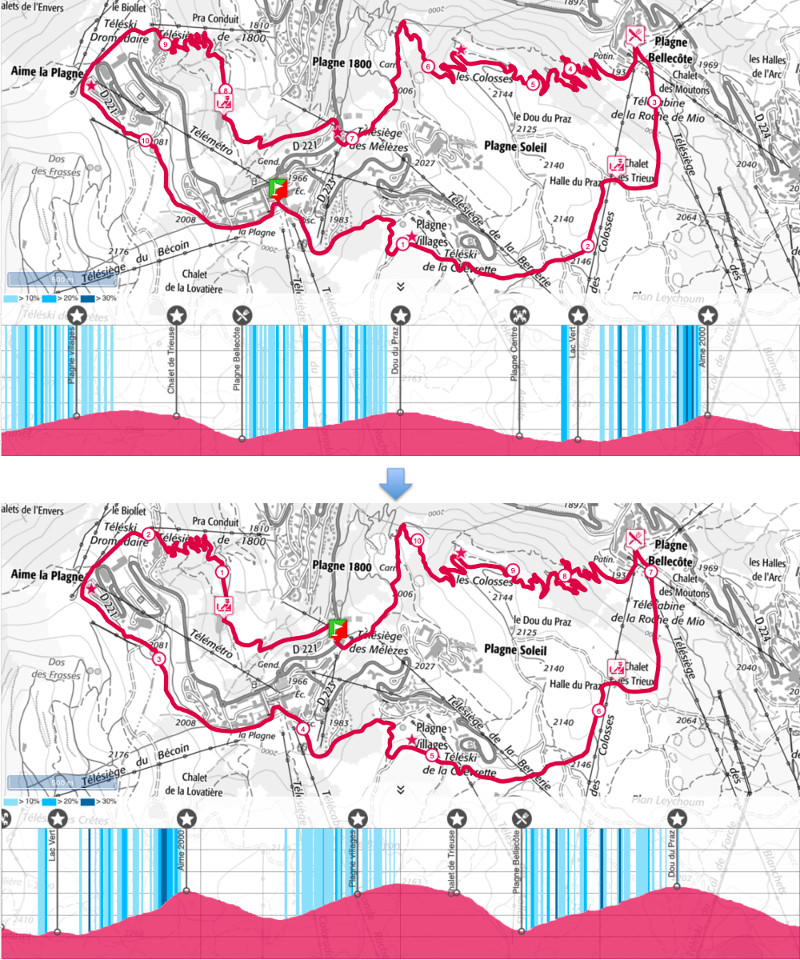
Trailer Ultra and Premium + subscribers can create sections to identify parts of the route (tricky area, roads, ski lifts, etc.).
You can create four sections per trace. Each section is associated with an unlimited number of intervals delimited by a starting point and an arrival point. All the intervals of the same section will have the same color on the profile. You can choose to ignore sections in the profile calculation.

If you edit a track, the position of the sections is automatically updated.
Cut out your work in small tasks so you do not lose your job in case of problems ... If you are working on a long trace, create it in several portions that you place in private and assemble these portions to make your final track.
Also remember to use your draft to make intermediate backups.

